
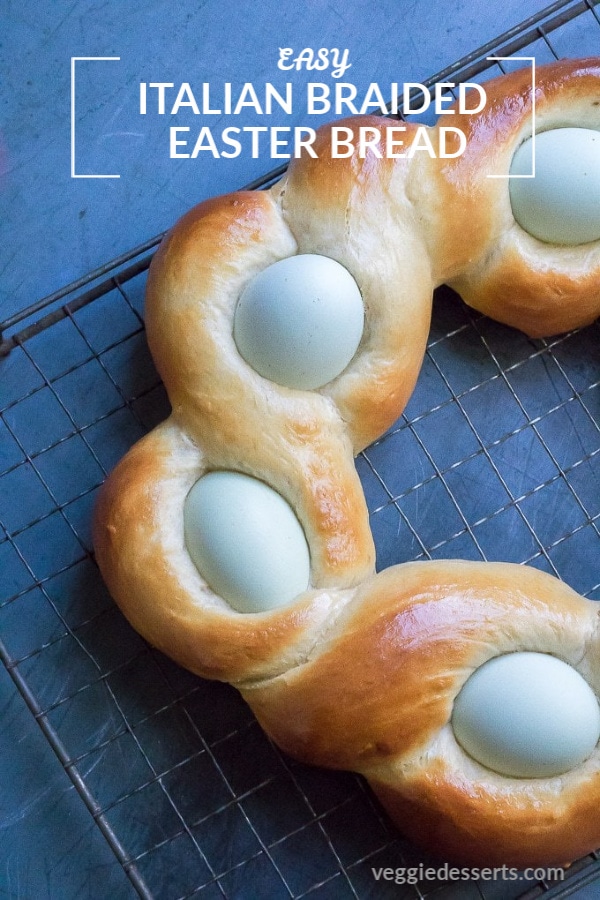
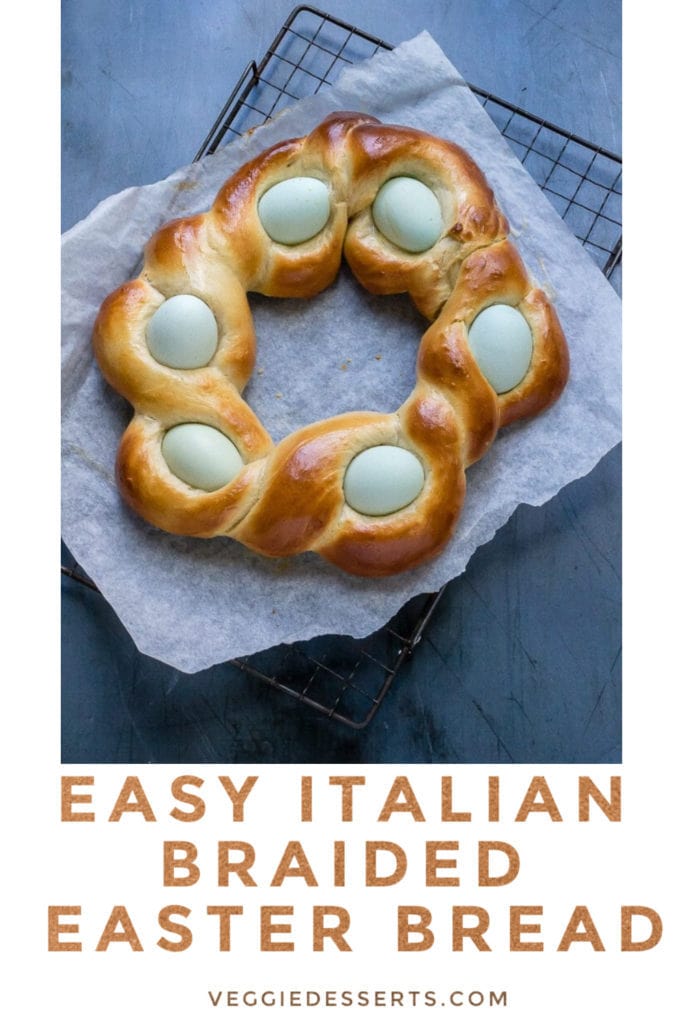
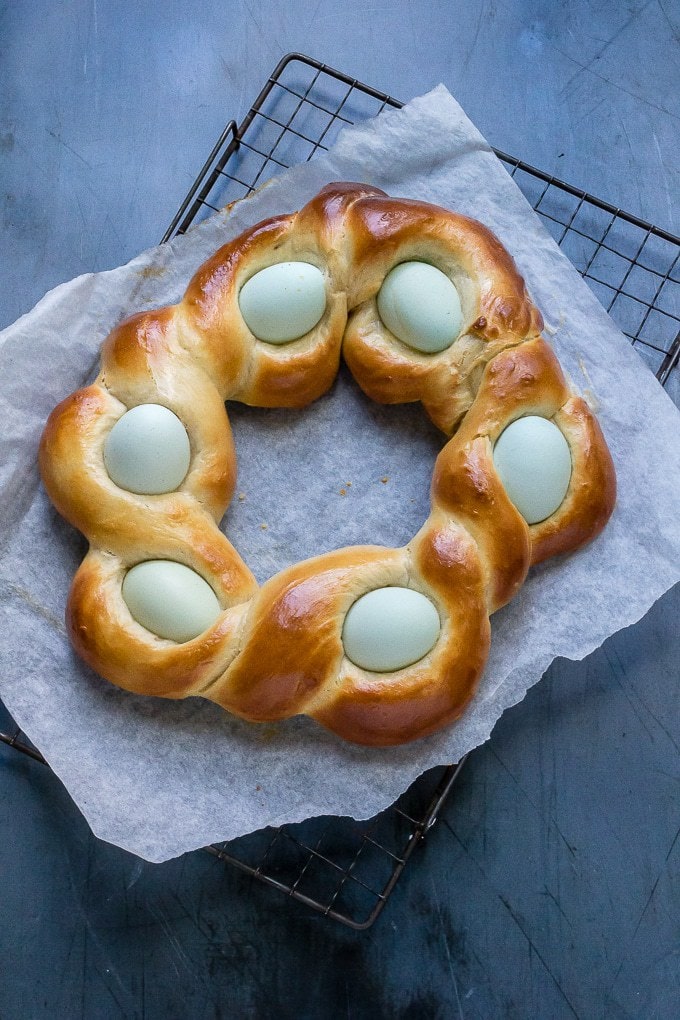
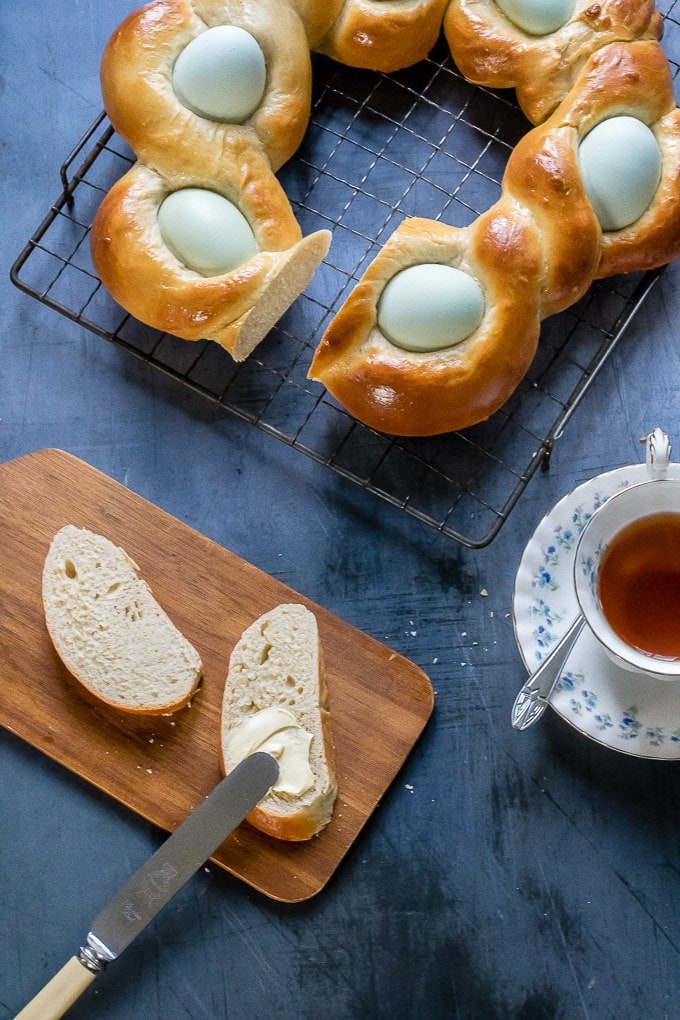
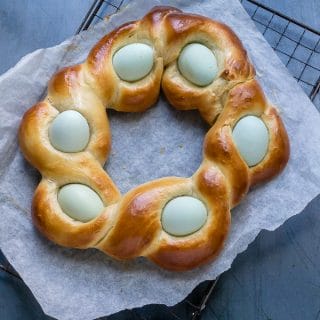
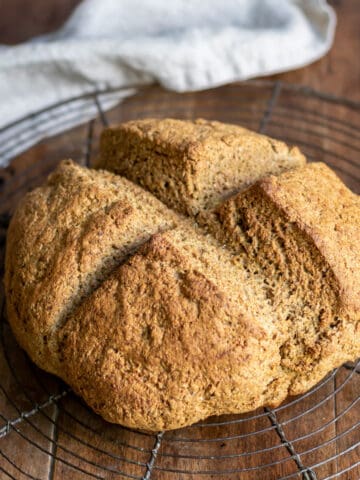
This traditional Italian Braided Easter Bread (Pane di Pasqua) is a showstopping centrepiece. The light and fluffy sweet bread tastes incredible and is braided around eggs that cook while it bakes.
Commissioned recipe.
Pane di Pasqua is the Italian name for this Braided Easter bread.
It's a traditional Easter recipe from Italy, though it's so delicious that it deserves to be on the worldwide stage.
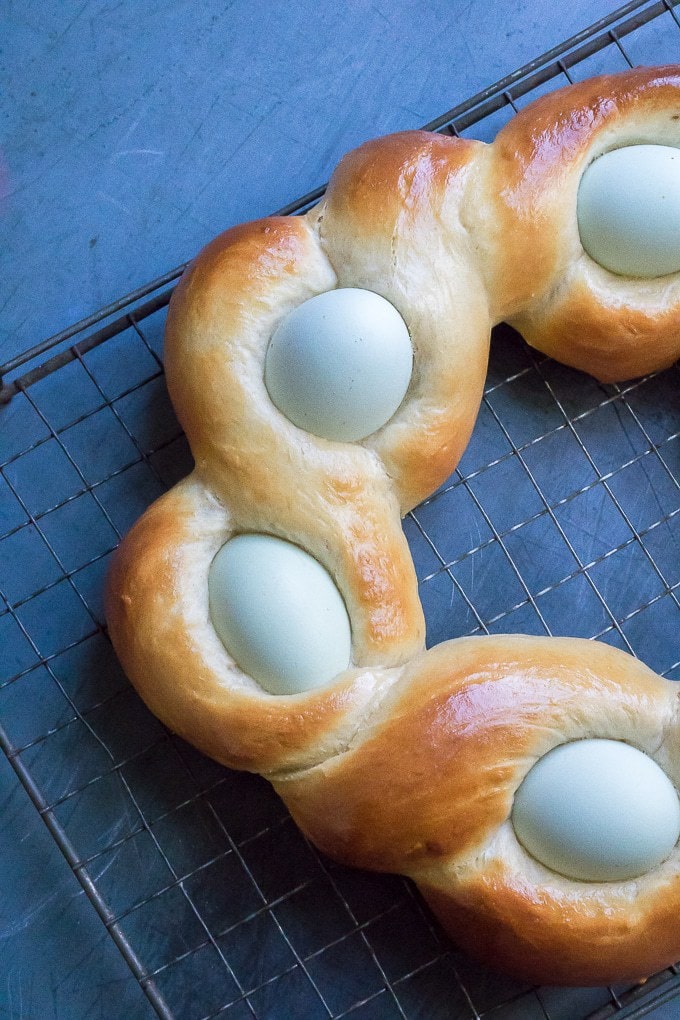
A sweet, fluffy bread is braided into a pretty wreath, with colored eggs nestled in the ropes.
It's the perfect Easter brunch centerpiece.
It's actually really easy to make, but you need to give it time to rise. Much of the time is hands-off.
Jump to:
Why You'll Love This Recipe
This Pane di Pasqua braided bread is wonderful for Easter brunch.
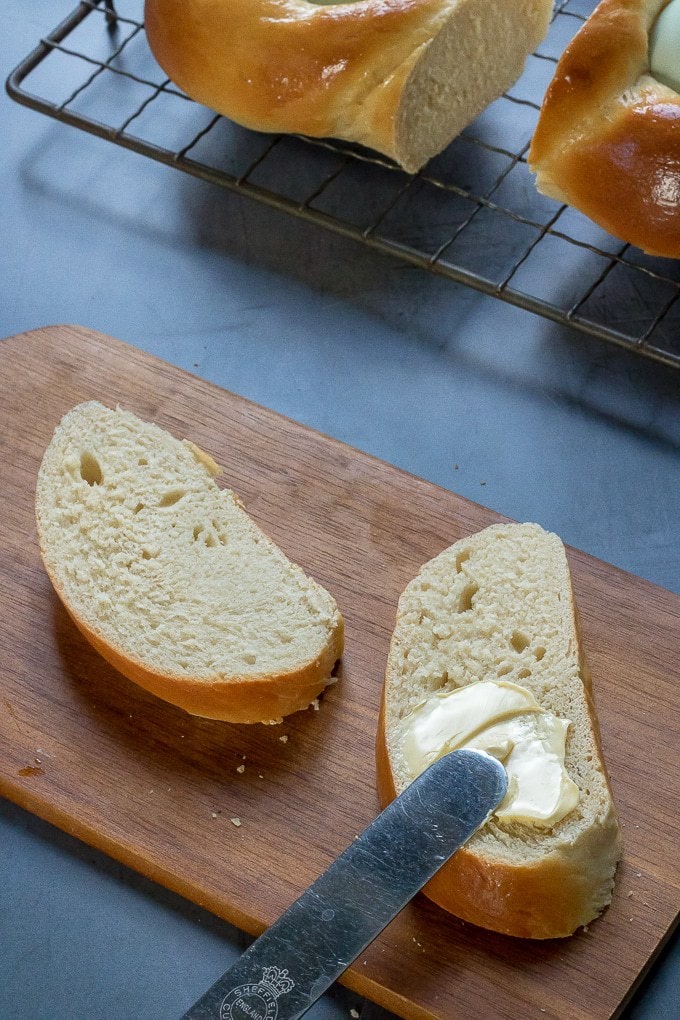
Because the eggs cook inside the bread, you've got a slightly sweet, rich bread, that's perfect eaten with butter and slices of the hard boiled eggs, with a pot of hot coffee.
It's so pretty that it's also great as a centrepiece of your Easter dinner.
It looks difficult, but is actually really easy to make.
It's a traditional Italian Easter recipe.
Making Braided Bread
Okay, I have to admit that I was a bit intimidated by this recipe at first.
It just looks so fancy!
I've seen the pretty wreaths over the years, but hadn't attempted to make one before.
So, I set myself the challenge and I'm thrilled with the results.
I've tested this a few times (including using a stand mixer and by hand) so you can be sure of perfect results.
I was really surprised at just how easy it is.
Sure, like any yeasted bread you'll need to allow it time to rise, but hey - you can get on with other things (might I suggest a Netflix binge of Seven Seconds).
Set aside 3.5 hours in total, but hardly any of that is actually hands-on.
This pretty wreath mostly likes a bit of 'me time' to rise and get all fluffy and delicious.
The rest of the time is just mixing, kneading, rolling and shaping.
And for this one the braid/plait is just a twist so not too fiddly.
It's easiest to make in a stand mixer, but you definitely don't need one.
You'll just have to use a bit more elbow grease for the 7 minutes of kneading.
Mind you, I find hand kneading quite therapeutic.
The rhythmic pushing and pulling of the dough (ideally to some good tunes on the radio), flour scattered about and the promise of hot fresh bread is a wonderful time in the kitchen.
If you're looking for a quick Easter dessert, try my 3 ingredient, 5 minute Hot Cross Bun Ice Cream Sandwiches!
Easter Breads
This sort of braided enriched dough bread is popular at Easter in many countries.
Eggs and sugar are added to the typical bread ingredients to give it a fluffy, soft texture and sweet rich flavour, very similar to brioche.
This is an Italian version (Pane di Pasqua), but similar ones can be found in Greece, Spain, Portugal and more.
As with most traditional recipes, there are regional variations; some might add citrus or anise flavours, others brush the bread in a sugar glaze and add rock sugar.
Serving Suggestions
Serve for breakfast, brunch, lunch or dinner this Easter.
Slice and enjoy with butter, topped with slices of the hard boiled eggs.
Spread with some Ginger Orange Marmalade or homemade Carrot Jam.
Why are there eggs in Easter bread?
Since before the prevalence of chocolate Easter eggs, the symbolism of eggs around Easter (representing Jesus's resurrection) was in traditional dishes like this plaited bread.
Aside from Christianity, in many cultures eggs are said to be a symbol of new life, fertility and rebirth.
For this recipe, I've used pale blue/green eggs that are naturally hatched that way (available in most UK supermarkets), but you could use plain eggs or dye your own in a rainbow of colours.
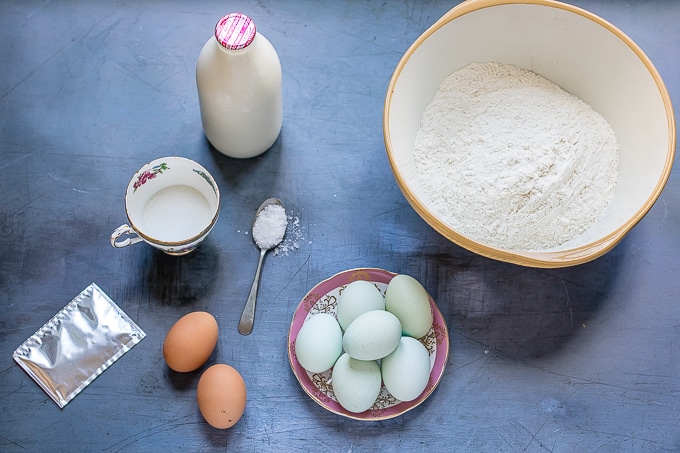
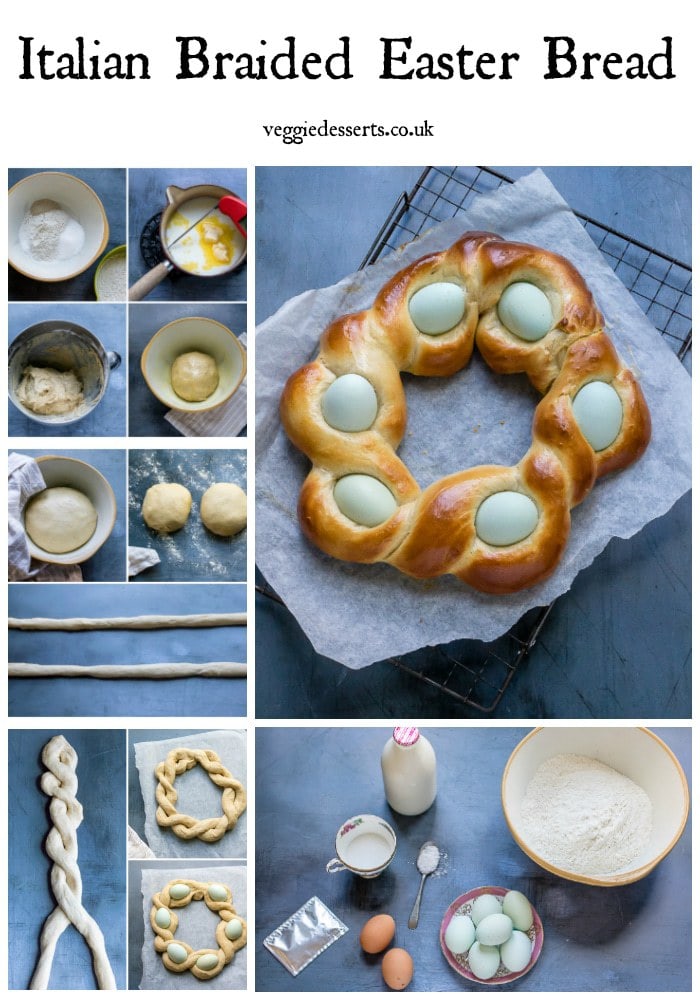
Ingredients
Flour
Sugar
Salt
Dry yeast
Milk
Butter
Eggs
To decorate I added naturally blue/green Cotswold Blue eggs. You could keep the decorative eggs plain or dye them colours.
Other equipment
Bowl
Stand mixer (optional)
Food Thermometer (optional, but very useful. I use a Thermapen)
Baking Tray
Baking paper
Step by Step Tutorial
Don't be put off by all these steps. I've shown everything in the pictures and it's all very straightforward!
Although you can do it by hand, it's even easier if you use a stand mixer for the mixing and kneading. Most of the time making this bread is just waiting for it to rise.
A food thermometer/Thermapen means you know exactly when the milk is the right temperature, and you can test the bread's temperature to make sure that it's done.
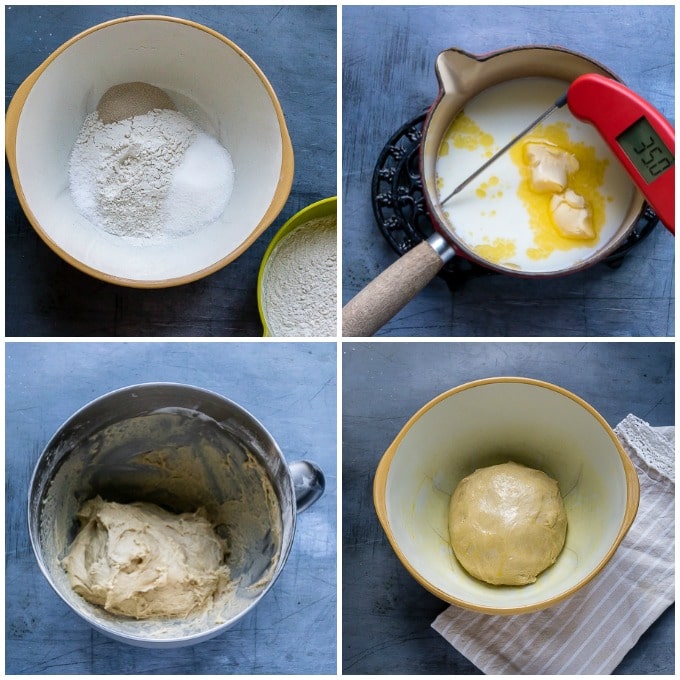
1: Mix 1 cup of the flour in a large bowl with the sugar, salt and yeast.
2: Heat the milk and butter until warm (50°C/125°F), then slowly mix into the flour.
3: Add the eggs and 0.5 cup of the remaining flour and beat it in well, then mix in the remaining flour gradually, until the dough pulls together.
4: Knead by hand or in a stand mixer until the dough is elastic, then let rise for 1 hour in an oiled bowl.
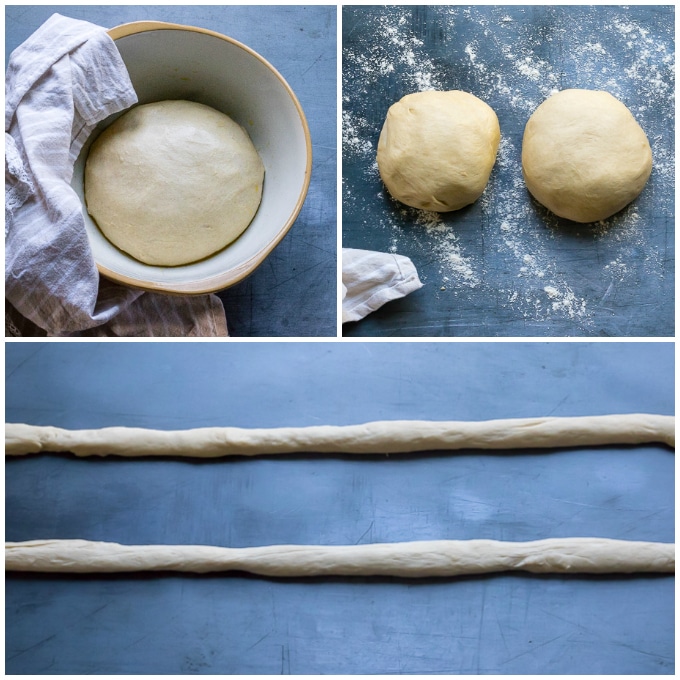
5: Punch down the risen dough.
6: Turn the dough out and divide in half and pat into two rounds. Cover and allow to rest for 15 minutes.
7: Roll each round into a long rope about 3 feet long.
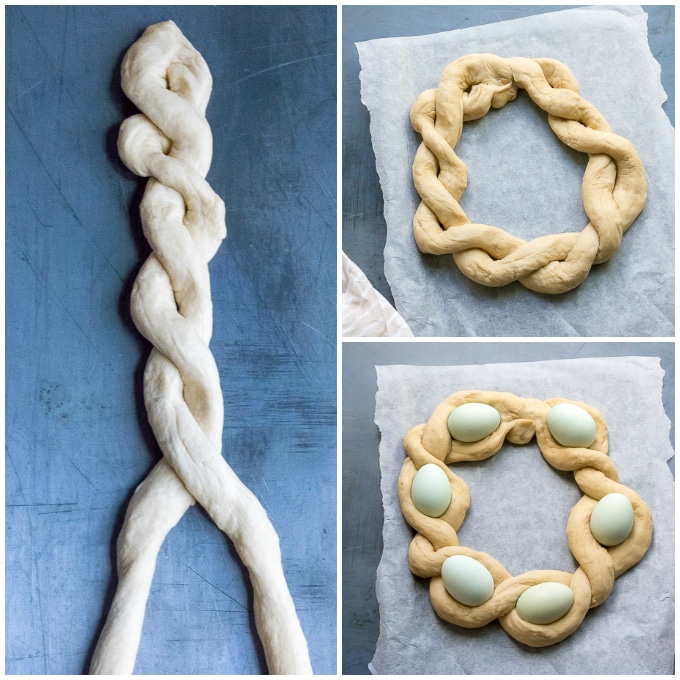
8: Pinch one end of each rope together and loosely twist to form a long braid/plait (as it rises the gaps will reduce).
9: Preheat the oven to 180°C/350°F. Line a baking tray with baking paper (or butter it). Form the braided dough into a large round on the prepared baking tray and pinch the ends together.
10: Nestle the raw eggs between the twisted ropes. Cover with a damp tea towel and let rise for 30 minutes.
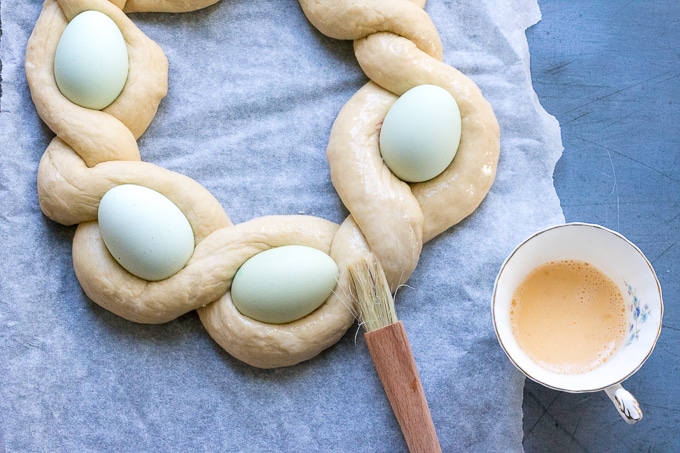
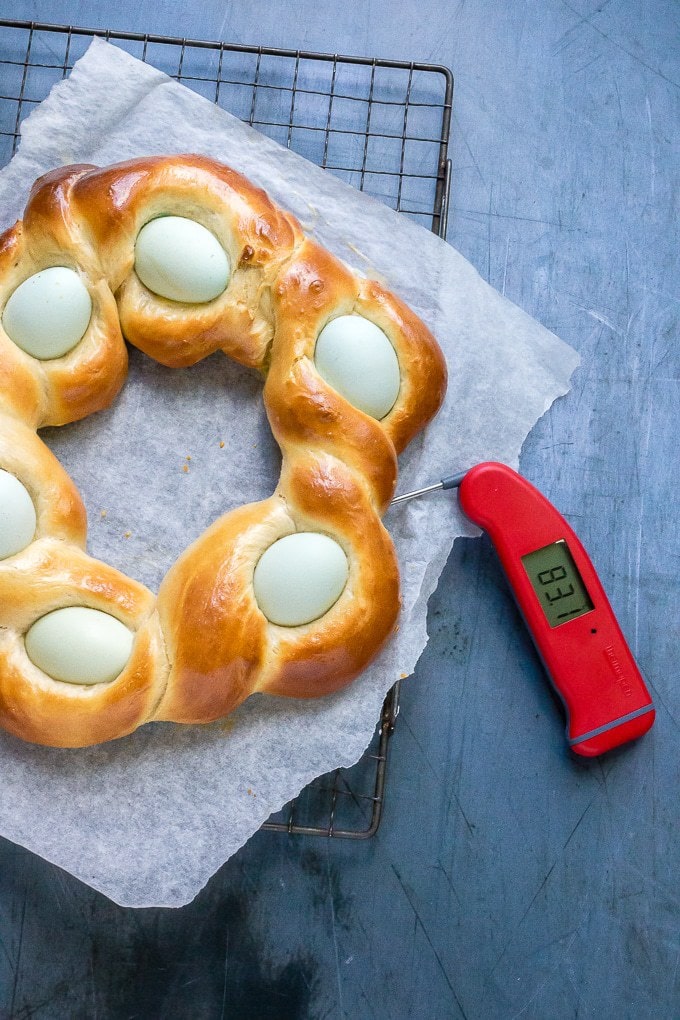
11: Brush the dough with an egg/milk wash and bake for 30 minutes.
Thermapen®
For this recipe, and many others, a Thermapen® food thermometer can take out the guesswork and help with a successful bake.
When a recipe calls for warm milk, it's hard to know exactly what that means. If the milk is too hot, it can kill the yeast, but checking the temperature and getting it to 50°C/125°F means it's perfect.
This is a soft bread, so it's easy to over or under bake it if you're not sure that it's done. Checking the temperature in the centre has reached 180°C/350°F means you can be absolutely certain that it's ready and won't be doughy or dried out.
Food thermometers are perhaps thought of as mainly useful for meat, but as a vegetarian, I can tell you that I use it all the time. Bread is definitely a big one. There's nothing worse than going to all that effort and having it doughy in the middle. It's perfect for testing my carrot and ginger hot cross buns. I also use it all the time for sweet recipes such as honeycomb and pecan brittle.
The SuperFast Thermapen® 4 Cooks Thermometer is the one I use.

Using a thermometer for perfectly baked bread
It's so disappointing to go to the effort, love and care of baking a loaf of fresh bread, only to cut into the cooled loaf and discover that it’s still doughy. I always use a food thermometer to avoid this.
For loaves in pans (like sandwich bread) poke the thermometer from the edge into the middle. For loaves that can be lifted, tilt them up carefully and poke the thermometer into the middle from the bottom.
Bread Temperatures
Enriched bread: 90°C / 190°F
Sandwich loaves: 90°C / 190°F
Soft Rolls: 90°C / 190°F
Harder crusty loaves: 95°C / 200°F
No-knead rustic loaves: 100°C / 210°F
Easter recipes
If you love this Easter bread recipe, you'll love these other Easter recipes too!
3 Ingredient Hot Cross Bun Ice Cream Sandwiches
Carrot and Ginger Hot Cross Buns
Chamomile Cake with Salted Honey Buttercream
Rice Krispie Easter Bird Nests
Easy Lemon Mini Babkas (Babeczki )
Disclosure: This post was commissioned by Thermapen. All opinions are my own. Thanks for supporting the brands that make it possible for me to be a food blogger and write Veggie Desserts.

Sign up for our free newsletter and never miss a recipe!
Plus, you'll get a free eBook: 15 Minute Vegan Dinners!

Check out the Veggie Desserts + Cakes cookbook on Amazon
📖 Recipe
Easy Italian Braided Easter Bread
Ingredients
- 400 g all-purpose flour (plain flour) divided
- 4 tablespoons granulated sugar
- 1 teaspoon salt
- 0.25 oz (7g/ 2 teaspoons) active dry yeast
- ½ cup (150ml) milk
- 2 tablespoons butter
- 2 large eggs at room temperature
To decorate:
- 6 whole raw eggs dyed or plain
To glaze:
- 1 egg and 1 tbsp. milk for egg glaze
Instructions
- Add 1 cup (125g) of the flour to a large bowl (or the bowl of a stand mixer with standard mixer tool attached) with the sugar, salt and yeast and mix well. Set aside.
- Add the milk and butter to a small saucepan over a high heat until milk is warm (125°F/50°C) and butter is softened (it does not have to be completely melted).
- Slowly add the milk mixture to the flour mixture; mixing constantly.
- Add the two eggs and ½ cup (60g) of the remaining flour and beat it in well.
- Add the remaining flour gradually in ½ cup (60g) increments, beating each addition in well. Keep mixing until the dough has pulled together.
- Tip the dough onto a lightly floured work surface and knead well for about 7 minutes until you feel the dough have more elasticity - aka the gluten developing. (Or use the dough hook in a stand mixer for approx 5 minutes).
- Lightly oil a large bowl and put the dough in and turn it to coat with oil. Cover with a damp tea towel and let rise in a warm place until doubled in size (about 1 hour).
- Gently push the dough down to deflate, turn out of its bowl onto a lightly floured surface, and divide into 2 and pat into rounds. Cover and allow to rest for 15 minutes.
- Roll each round into a long rope about 3 feet long (it will be about 1.5 inches thick).
- Pinch one end of each rope together and loosely twist to form a long braid/plait (as it rises the gaps will reduce).
- Preheat the oven to 350°F / 180°C. Line a baking tray with baking paper (or lightly butter the tray).
- Form the braided dough into a large round on the prepared baking tray and pinch the ends together. Nestle the raw eggs between the twisted ropes. Cover with a damp tea towel and let rise for 30 minutes.
- For the glaze, whisk the egg and milk together. Gently brush over the dough (not the eggs), taking care not to go right to the base or you’ll ‘glue’ the bread to the pan/baking paper as it bakes.
- Bake for 30 minutes or until golden and a thermometer in the centre reads approx 185°F /85°C.
Nutrition
The nutritional information provided is approximate and can vary depending on several factors, so is not guaranteed to be accurate. Please see a registered dietician for special diet advice.
Jeanette
Such a fun idea for Easter bread 🙂 Looks really good.
Chichi
Would love to make this for Easter. Looks so fancy. Thanks for this easy recipe and the tip about the use of a thermometer for better bread making.
Jacqueline Meldrum
I've never tried this before, but that looks wonderful Katherine. I love your new backdrop too.
Julia
This Easter bread definitely is a showstopping centerpiece! 🙂 I've been meaning to try this bread for ages so thanks for the recipe! I still have time to give it a go! 🙂
Lucy Parissi
What a sensational loaf and the step by step images are so helpful. I wouldn't be withuot my Thermapen, it's so useful.
Choclette
This looks spectacular Kate and very clever too. Love the blue eggs. What a fantastic bake for an Easter breakfast.
Jessica Robinson
Such an amazing bread for Easter! I'm loving your beautiful step images. I'll definitely be making this soon!
Leslie
I've always been fascinated by Easter bread, but had no idea how to make it. It looks so soft and delicious.
Edyta at Innocent Delight
This looks absolutely stunning. I'd love to make it for Easter.
Adriana Lopez Martin
I have alwasy wanted to learn how to make this bread, it is a masterpiece indeed. I will try to make it for this Easter wish me luck =)
Emily
This bread always looks so beautiful, I love that you used naturally pale blue eggs for this, great idea!